
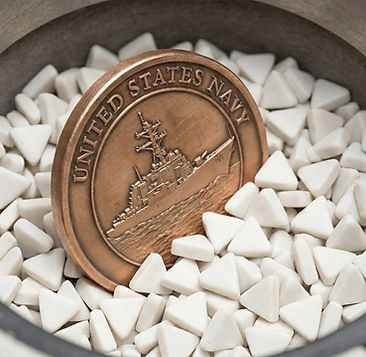
STEP 1: CREATING A UNIQUE COIN MOLD

COMPUTER-AIDED DRAFTING (CAD)

INVERSE COIN MOLD
Creating a unique coin mold is a complex and rewarding process that transforms a design into a tangible object. The journey begins with the creation of a Computer-Aided Design (CAD) of the desired coin. The CAD design is an essential step that allows the designer to visualize the coin and make any necessary changes before it is made into a mold. The CAD design is then fed into a Computer-Aided Manufacturing (CAM) software that generates the toolpath for the mold-making process. This toolpath guides a cutting machine, such as a CNC mill, to carve the mold from a block of metal.
The next step in the process is to create the mold. This is typically done using a high-precision cutting machine that follows the toolpath generated by the CAM software. The machine removes material from the metal block to create the mold, which has two halves that fit together perfectly. The mold is then cleaned and polished to remove any burrs or rough spots, ensuring that the coins produced using the mold will have a smooth surface.
Once the mold is ready, it can be used to produce multiple copies of the coin using a die-casting process. This process involves melting metal, such as bronze, brass, or zinc, and pouring it into the mold while it is still in a liquid state. The mold is then closed, and the metal is allowed to cool and solidify. Once the metal has solidified, the mold is opened, and the coin is removed.
STEP 2: DIE STRIKING COINS


Die Striking is a manufacturing process that results in high-quality, custom-made challenge coins. The process involves using a steel die and a hydraulic press to produce coins that are both detailed and durable. It involves using a steel die and a hydraulic press to produce high-quality custom coins.
The process starts with a design, which is created in a Computer-Aided Design (CAD) program, and then converted into a metal die. The die is a reverse image of the coin design, and it is made from a solid block of steel. The die is then mounted in a hydraulic press, which is used to strike the metal blanks and create the final coin.
The process of Die Striking a challenge coin involves placing a metal blank, usually made from brass, copper, or a similar metal, into the press. The die is then brought into contact with the blank under high pressure, causing the metal to flow into the recesses of the die and take on the shape of the design. This results in a high-quality, custom-made coin that is both detailed and durable.
One of the benefits of Die Striking is that it allows for intricate designs to be produced, including fine details, text, and logos.
STEP 3: EDGE TRIMMING & COIN DEBURRING
_edited.jpg)
The metal stamping and cutting process in coin making often leads to sharp ridges and burrs across the entire surface of the coins. To handle the coins safely, it is necessary to remove these burrs through the deburring process.
The steps required between die striking and deburring may vary based on the chosen edge design. In some cases, a hand-cut edge is desired, which involves manually cutting the intricate edge design on a rotating table as the coins are loaded onto it. The deburring process is then performed on the set of finished coins.
Deburring can be done in several ways, including tumbling the coins in dry media or using a machine with water, soap, and a porous stone that rubs against the coins as it spins. Coins can also be deburred manually by placing them on a wooden block and running them against a spinning wheel. The final result of deburring is a set of coins with a smooth and polished texture.
STEP 4: PERSONALIZED METAL PLATING & COLOR INFILLING
The sequence of custom metal plating and colorfilling may vary based on the type of challenge coin. For soft enamel coins, metal plating is done first and then colorfilling, while for hard enamel coins, colorfilling is done first followed by metal plating.
As soft enamel coins are the most popular type of custom challenge coins, we will describe this process in detail.
Recently deburred coins are gathered and suspended by copper wire, which is a crucial aspect of the metal plating or electroplating process. Electroplating is primarily a chemical process, where the suspended coins are immersed into troughs filled with water.


The coins are first submerged in clean water and then in various chemical solutions to clean their surface, ensuring that each coin receives an even layer of metal plating. The actual metal plating process involves soaking the coins in a solution containing the desired precious metal for covering the design.
Common options for metal plating include silver, gold, or copper, but black nickel and rainbow metal coins are also available. An electrical current is applied to the solution containing the coins, which are grounded by copper wire. This causes the coins to attract the precious metal and create a permanent, thin layer of custom metal plating.
SOFT ENAMEL & HARD ENAMEL

After being removed and dried, the coins proceed to the color-filling stage, which can be done either by hand or through the use of automated machines. For smaller orders of around 100 coins, manual color-filling is more efficient. Our production team employs special syringes filled with soft enamel paint to fill the recessed areas of the design. Once all the colors have been applied, the coins are baked in an oven to allow the enamel to cure.
Note that hard enamel coins go through color-filling before metal plating. This is because hard enamel coins have a smooth texture, with the enamel paint evenly covering the raised metal strokes of the design. On the other hand, soft enamel coins have a more layered appearance, with the enamel paint residing in the recessed portions of the artwork and being separated by the raised metal strokes.
So, the colorfill areas on a hard enamel coin are actually overfilled, unlike soft enamel coins which only need a small amount of paint to reside in the recessed area.The recessed areas of a hard enamel coin that need color are overfilled with enamel paint, and then the coins are placed in an oven to let the paint cure. This process is repeated for every color. Once all of the colors have cured, the coins are polished by hand.
The polishing process grinds away the excess enamel paint so that the surface of the coins has a crisp, even appearance.
When it comes to metal plating, the only difference between hard and soft enamel coins is that hard enamel coins already have all of their enamel colors in place before going through the plating process.
STEP 5: QUALITY ASSESSMENT & LASER ENGRAVING
The final stages of challenge coin production involve laser engraving and quality control. If the design requires, laser engraving adds intricate details that cannot be created through the die-striking method. This can include names on the surface or edge of the coin, sequential numbering, and more. After laser engraving is completed, the coins undergo quality control and packaging before being sent to the customer.
At the conclusion of the production, all challenge coins undergo a thorough quality check. If any coins are found not to meet our strict standards, they are replaced to ensure a complete and flawless order is delivered. Once they have passed inspection, they are packaged and shipped via fast delivery methods, usually arriving within two days.
THE DIFFERENCE BETWEEN COOL AND WARM COLORS
It may seem apparent, but picking a theme for your coin design is fantastic. For a coin design, the artist will have enough to work with if you have provided corporate artwork or unit badges. Warm colors are energetic and bright, similar to reds, oranges, and yellows. People who see them frequently become excited. Most individuals find that cool hues, which are found in the range of greens, blues, and violets, are relaxing. Overuse of color in designs makes them difficult to read and distracting. A design is pleasant when the colors complement one another, and the artwork is simple to understand and enjoy since it directs the viewer's attention to certain places.
We usually ask you for your plating preference when you submit to HonestCoins LI artwork since it is the easiest option to start when selecting a color scheme. Our copper and gold plating options complement warm colors best, while silver plating alternatives complement cold hues. Coins with nickel or black metal plating go nicely with either warm or cold hues.
COINS WITH ANCIENT PLATING
Coins with ancient gold or silver plating are significantly less reflective than their equivalents with a high polish. This implies that the elevated and recessed portions of an untreated piece of art will have natural shadows and somewhat varied colors. High-polish plating works best with dark hues to create much-needed contrast, although antique plating goes well with just about anything. So go ahead and incorporate some more vivid hues into your design. These are just a few illustrations of antique-plated coins that gradually add color to the design.
HIGH POLISHED PLATED COIN
Plating with a high polish is very reflecting. The plating must be balanced with your artwork, yet this may be a great approach to creating a distinctive design. Glare or smearing can detract from the more intricate design elements if a coin excessively emphasizes high gloss plating. This illustration demonstrates how well the highly polished gold plating on the side makes it harder to discern the essential features in the artwork than the ancient gold plating on any side.
Color adds a lovely contrast to artwork and maximizes the potential of any highly polished coin design. The following coin is made of high-polish silver and was designed for Newsfeed. The blue and black color scheme highlights the bigger coin's gear form and the smaller pieces' mountains and ridges. These colors are used to assist the artwork's most delicate details to stand out.
Recessed sandblasting and dual plating are two additional techniques for generating contrast in a high-polish design and using color fillings. The bigger coin has a textured area between the blue gear design and the edge. The surface becomes less reflective and more smudge-resistant as a result. Recessed sandblasting offers a little contrast, albeit less than adding color fills, which may be all your design requires. Using color to create the ideal dual-plating design is only sometimes necessary.

METAL CHALLENGE COIN IN BLACK
A stunning design only sometimes requires high-polish plating. These black metal coins combine strongly contrasting colors to enhance the artwork and bring the eye to the delicacy of the little elements in the design. Black metal coins absorb light, but high-polish coins reflect it. With a bright light source, viewing the artwork with adding color to the design will be easy. The colors that occasionally outperform one another are blues, reds, and whites. Your personalized coins have a design that you developed. You've glanced over the proofs our artists produced for you and selected most of the modification choices you're interested in. The next step is to select the plating style that will highlight your design and set your coins out from the competition.
The first selection requested and a few more possibilities our artists believe would be suitable for your design are frequently included on proofs from HonestCoinsLI. The dual plating enhancement we provide is one of the choices you should consider. It's a simple method to ensure your coin will stand out and be remembered.